On 1C? how to view employee salaries in 1s?
Often, when working with 1C, an accountant realizes that the functionality built into the standard configuration is not enough. Either it turns out that you don’t know where to look for the necessary data, or you realize that the report does not display all the necessary summary results.
It turns out that many similar problems can simply be solved by creating a custom selection and outputting this data to a report.
You can make such a custom, “your own” selection in several ways. Can
in the configurator, write program code that includes a request that will process the data in the infobase and output the data to the one we created. This is a good method; it allows you to completely manually control the report generation process and make adjustments at any stage of creating the final document. But in order to write the program code for the report and create the final one, you need to have sufficient qualifications, which is often difficult for an accountant or a novice system administrator.
You can also make the necessary report using the so-called ACS. This is an abbreviation. So it is a Data Composition System. Looking ahead, I will say that this method is simpler, because... has a graphical method for displaying the structure of the information base and, in most cases, does not require knowledge of the syntax of the built-in 1C language.
In order not to carry on an unfounded conversation, we will now move from theory to practice. Simply put, we will create a report on the access control system in the 1C program, standard configuration Accounting 8.3. Because Since the configuration is typical and removing it from support is not part of our plans, we will make the report external. Which, however, will not affect the creation process.
So, let's begin
Preparation of a report.
First, let's create and save our external report file to disk.
At this point we need to decide what we will achieve from the 1C database. Those. what data we should display in the generated report. Let’s assume, for example, that the responsible employee of the accounting department needed to produce a report for a certain period on the salaries received by employees in the context of advances and salaries themselves, indicating positions and decoding documents. It seems that such a report will be of interest not only to accounting employees.
First, go to 1C Configurator and click “File” - “New” in the main menu. In the proposed list, select “External report” and click the “Ok” button to confirm the choice.
Let’s call the newly created report “Employee Salary Report”, for example, and save it to disk.

Creating a report on the access control system.
After saving the external report to disk, click the “Open data composition scheme” button and confirm the creation of a new scheme by clicking on the “Finish” button.


In the data composition diagram form that opens, create a new data set - a request. We will obtain the necessary information using an SQL query.


Finally, we have come to the creation of a tool for obtaining the sample data we need. In the query designer, we will select the metadata objects that will participate in the result.
From the column with metadata objects (“Databases”), select tables containing data for our report. We will need: the accumulation register “Mutual settlements with employees” to obtain data on salary movements and the information register “Current Personnel Data of Employees” to obtain information about the position of each specific employee.

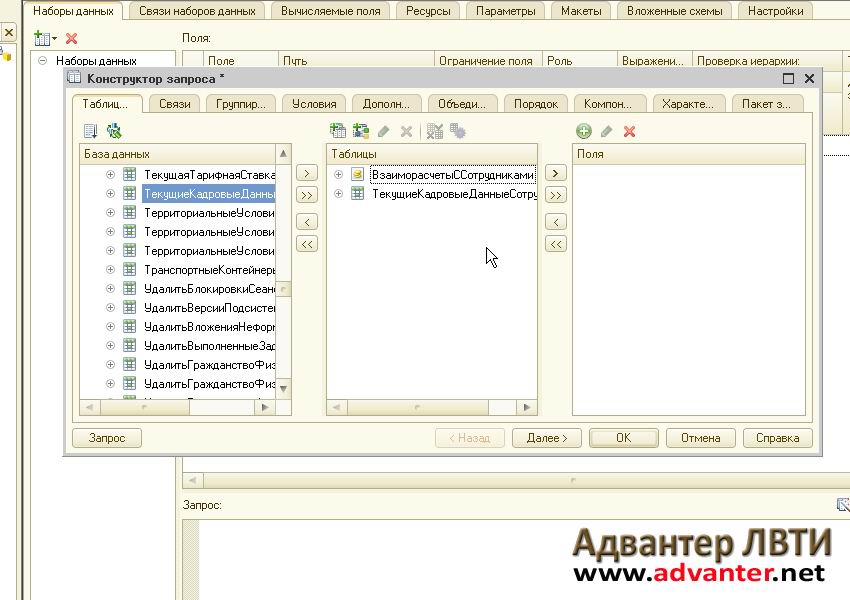
Next, similarly, from the details of these two registers we will select the fields that will form our report. These are Period, Employee, Settlement Type, Settlement Amount, Current Position and Registrar. We will need a registrar for subsequent decryption of financial documents.

On the “Links” tab, we will create a connection of our selected registers using the “Employee” field

On the “Conditions” tab, enter the condition for selecting the type of mutual settlements. Let's add the Settlement Type parameter, which we will set later at one of the following stages.

Also, to determine the period, we will create two conditions that, in fact, will limit the required period. Let these be the parameters DateFrom and DateTo. We will finally describe them at the next stage. Note that to set the period it is convenient to specify the “Between” operand.

We do not need the remaining tabs; at this stage, the completed data will be sufficient to generate the report we need.

Click the “Ok” button
The SQL query we need will be generated in the field.

Generating report parameters
Let’s go to the “Resources” tab and configure the output amount so that this data is calculated based on the employee.

Options.
Let's go to the "Parameters" tab. Here we see that the system automatically added the previously entered Settlement Type parameter and two parameters for determining the period. All we have to do is slightly modify the generated Settlement Type line for our report. Because We will need a sample for both salary payments and advance payments, then we will also need the Settlement Type parameter twice.
Copy the line Type of Mutual Settlement by clicking on the first one with the right mouse button.

Next, we indicate that we need data on advances and salaries. For one line of types of mutual settlements, we will select advance payment, for the second - salary. We will also remove the availability restriction for period parameters. This is important because the user will be able to set the period independently.

Formation of the sample type.
For our simple case, we only need to generate a report list without additional settings. Therefore, right-click on the “Report” line and select “Settings Designer”. Let me note for those interested that the access control system, in fact, allows you to work quite widely with sample data to create the appearance of reports. There are other, subtle tools for this. But we are considering the simplest example, so we will limit ourselves to the “Settings Designer”.


In the next window, select the fields that will be displayed in the report. These are Employee, Period, Settlement Type, Current Position, Settlement Amount and Registrar. After editing, click “Next”.

Then, in the next window, we will determine the desired type of grouping. This is for the Employee field. Click “Next”.

And, in the last window we will assign an ordering field. Sort by the Settlement Amount field, in descending order. click “Ok”. 
A few finishing touches and our report will be ready. For better visualization, let's add a grouping field Current Position. To do this, double-click the “Employee” line and add the required field. Confirm the selection with the “Ok” button

Creating reports is one of the main functions of any accounting system. What types of reports exist in 1C Accounting 3.0, how reports are configured in 1C Accounting 8.3 and what tools exist for creating new reports - we will look at today.
Types of standard reports
The company's 1C accounting program is initially pre-installed with a wide range of reports that allow you to obtain all the necessary information. Their full list is presented in the “Reports/Standard Reports” section:
Also, each section of the program presents other types of standard reports, for example, salary reports in 1C 8.3 are stored in the “Salaries and Personnel/Salary Reports” section.
In each report, there is the possibility of “additional customization” of the report, namely, you can add or remove some additional fields, add grouping, selection, etc.
Let's consider the setup option using the example of adding an additional field to the standard report “Account balance sheet” (select account 10). To do this, from the “Show settings” button, go to “Additional fields”, add a new field, and in the selection form go to the field we need, for example, to reflect the item number in the report, select the “Article number” field, which is located inside the “Nomenclature” field (to expand the field you need to click “+”):
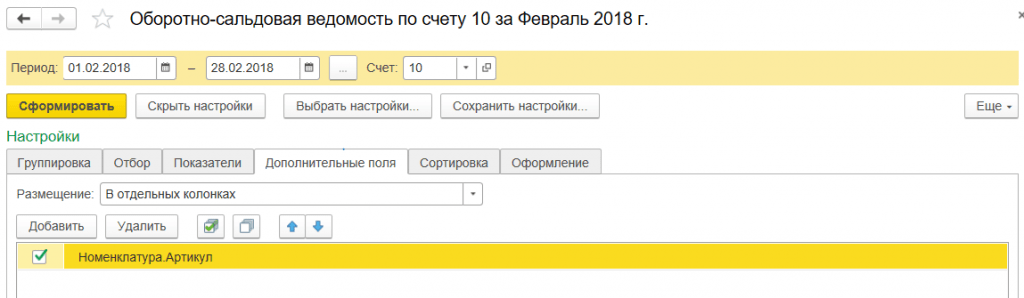
After clicking “Generate”, the additional field we selected appears.
As an example, consider a situation where the report requires including the entire list of items containing the word “boot” in the name. What do I need to do? By clicking “Show settings”, go to the “Selection” tab, add a new field, and in the window that appears, opening the “+” field “Nomenclature”, select “Name”.

After generating the report, we receive a nomenclature that contains only the value we specified in the name.
Generating reports by document
In the “Standard reports” section there is a universal report that allows you to display information from such configuration objects as:
- Document;
- Directory;
- Accumulation register;
- Register of information;
- Calculation register.
Let's look at examples of situations where a report will help the user not to resort to developing external reports, but to use a standard settings mechanism.
For example, we need to generate a report that will reflect all goods received from a specific counterparty for a certain period. To do this, in the report header, select from the drop-down list the type of object – “Document”, the type of object – “Receipt (acts, invoices)”, and indicate the type – “Goods”.
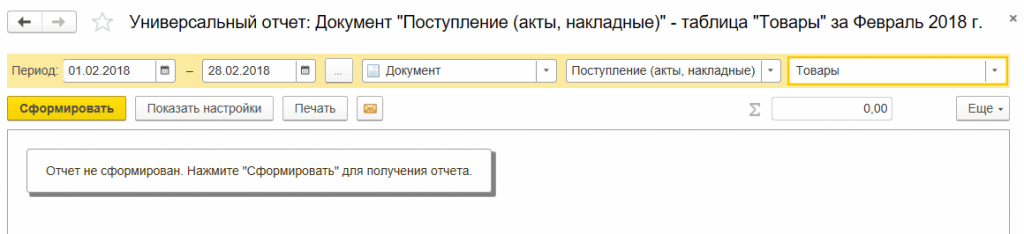

*The Counterparty field is not there initially.
In the “Type of comparison” field set “Equal”, in “Value” select the desired counterparty from the directory.

At the top of the report, indicate the required period and generate the report.

You can save the settings we have made: to do this, click the “More/Save” button.
Let's consider a situation where, in order to correctly generate regulated reporting, it is necessary to check all movements in the “Separate VAT accounting” register by document.
To do this, in the report header, select the object type from the drop-down list - “Accumulation Register”, in the next field select the object type - “Separate VAT accounting”, in the last field select the type - “Balances and turnover”.
In order for the report to display information in the context of documents, click the “Show settings” button to go to the report settings, then to the “Indicators” tab, add a new field and in the window that appears, select the “Registrar” field (“registrar” is the document that contains a movement was formed along the accumulation register). The newly added field is reflected at the bottom of the list of fields by default: using the “blue arrows” we move the “Registrar” field to the top of the list.

In this article, we looked at what options exist for working with reporting in 1C Accounting 8, how to use the report settings and what information can be obtained using a universal report.
Before starting a conversation about reporting in 1C, it is important to point out that reporting can be of three types:
- Regulated;
- Standard;
- Own.
Each of these types is formed on the basis of the primary documentation entered into the program and serves specific purposes.
Regulated reporting is a set of legally approved printed forms and electronic documents that each organization must periodically submit to regulatory authorities.
Own reporting is developed by each organization separately and serves to display the results of the enterprise’s activities at various stages.
Standard reporting represents commonly used forms of displaying business transactions.
Regulated reporting
All standard 1C configurations are intended not only for accounting and recording business transactions, but also for generating reports based on the entered data for transmission to:
- Tax Service;
- Federal Statistical Service;
- Various foundations and supervisory authorities.
Filling out regulated documents, as a rule, occurs at the end of the reporting period (quarter, year). Regulated reporting forms are created separately by each federal service and are periodically changed and refined.
1C specialists carefully study all changes in the legislative framework and, based on these changes, update regulated reports. Thus, if the user has a valid subscription to information technology support (ITS) and systematically updates the configuration, he can be sure that reports for transmission to regulatory authorities will be generated in accordance with all current requirements.
Important! Before generating and submitting reports, check that all business transactions have been entered and correctly documented in the program, and also make sure that routine work, such as month-end closing, has been completed.
Creating and filling out a regulated report
One of the oldest and most important documents for reflecting the economic activities of an enterprise is the “Balance Sheet”. The currently relevant form was developed in 2010 by the Ministry of Finance of the Russian Federation and approved by Order No. 66 of 06/02/2010. According to this order, starting from 2013, all organizations operating in the Russian Federation must annually submit it to the tax authorities.
In order to open the required regulatory report, we must (in the Accounting 8.3 program) go to the “Reports” subsystem and select the appropriate command in the “1C Reporting” menu (Fig. 1)
Please note that some objects of the program interface, and, accordingly, the ability to generate regulated documents may not be available if the user does not have rights to access certain subsystems.
In the form that opens (Fig. 2) we will see:
- What reports are already registered in the database;
- During what period were they created?
- Type of report (primary or corrective);
- The state in which the report is (submitted, in progress, prepared).
 Fig.2
Fig.2
Using the corresponding buttons we can:
- Create the report we need;
- Load it from a file saved on your computer;
- Check whether the upload is formed correctly and whether the checksums correspond to the algorithms embedded in the program;
- Print a spreadsheet document generated based on the entered data;
- Create and send an upload file.
We can find the “Balance Sheet” we need by clicking on the “Create” button. The result of the click will be a form (Fig. 3)  Fig.3
Fig.3
If in the window that opens, on the “Favorites” tab there is no “Accounting statements (since 2011)” item, we will have to go to the “All” tab and select this document.
Before you start entering basic data, the program will prompt you to fill in some fields (Fig. 4)
 Fig.4
Fig.4
If the configuration maintains accounting for several organizations, the “Organization” selection field will be available on the form; in addition, you must fill in the period, information for which will participate in the formation of the balance sheet.
By clicking on the “Create” button we will open the corresponding form (Fig. 5).
 Fig.5
Fig.5
You should immediately pay attention to one circumstance: “Accounting statements” are not only the “Balance Sheet”, but also:
- Report on the financial results of the enterprise;
- Statement of changes in equity;
- About cash flow;
- About the intended use of funds, etc.
And all these reports can be generated by clicking one “Fill” button (Fig. 6) by selecting “All reports”.
 Fig.6
Fig.6
To fill out a specific document, you must select “Current”.
The completed “Balance Sheet” form is presented in Fig. 7
 Fig.7
Fig.7
You can add your own data to any field by clicking on the “Add Row” command.
All numbers in the key fields can be deciphered by clicking on the corresponding button in the header.
The receivables breakdown form is shown in Fig. 8.
 Rice. 8.
Double-clicking on any decryption amount opens the standard “Account balance sheet” report.
Standard reports
“Turnover balance sheet”, “Subconto analysis”, “Account card”, “Chess sheet” and many other forms that allow you to analyze accounting data are usually called standard reports.
Let's consider the principle of their operation based on the “Turnover Balance Sheet”. The form in Fig. 1 shows that standard and regulated reports can be called from one subsystem.
Let's open the object we need (Fig. 9)
 Fig.9
Fig.9
Before generating a report, the user can set the period for which the data will be taken into account when filling out the form, as well as make its finer settings (by clicking on the “Show settings” button).
In Fig. 10 we see that the program provides such a detailed description of the unloading that the settings had to be divided into several tabs.
 Fig.10
Let's take a closer look at this structure:
- Grouping – checking the “By subaccounts” checkbox indicates that the form will contain data in the context of not only the main accounts, but also their subgroups;
- Selection - here the user can indicate for which organization, division or account he wants to see data, and also determine the need to display information on off-balance sheet accounts;
- Indicators – it is determined whether figures for accounting or tax accounting will be displayed;
- Detailed balance – for which accounts and subaccounts detailed information is required;
- Additional fields – determine the appearance of the form;
- Design – should negative values be highlighted in red and the auto-indent reduced?
As in the regulated “Balance Sheet” report, you can call up a form for deciphering a particular value in the turnover.
Own reports
Of course, standard reporting mechanisms allow you to seriously analyze the economic activities of an enterprise, but sometimes they are not enough. In this case, the user can (with minimal training) independently display on the screen the information he is interested in in one aspect or another. For this purpose, the program provides several mechanisms:
- Universal report;
- Data layout diagram (DCS).
In the second case, in addition to knowledge about the structure of information storage in 1C, the user may need access to the configurator, as well as some understanding of the 1C query language. But the reports obtained using the access control system are distinguished by great flexibility in customizing their appearance and parameters.
The universal report is less universal, but much easier to use; it can be called from the same subsystem. In Fig. 11 we show the appearance of this object
 Fig.11
What we see:
- Standard period selection;
- The type of object for which we want to display information (in this case, an accumulation register, but it can take values of a directory, information register, document, accounting register);
- Specific name of the metadata object (“USN information on income”);
- The table we are referring to is in this case “Turnover” (for accumulation registers it can also take the values “Remaining” and “Remaining and Turnover”).
A more detailed description of what data, with what selections and sorting directions should be displayed in a spreadsheet document can be specified in the report settings form.
All accounting, whatever it may be, is carried out for the sole purpose of viewing the results in the report.
This lesson is devoted to an examination of what 1C reports are and the principles of working with them.
Accounting results are the final figures calculated by registers. For example, there were movements +1000, -200, -300, +100, total = 600.
The results are usually looked at in the context of directories: warehouses, nomenclature, counterparties. Thus it will be: the total for the product “Shovel” is 200, the total for the product “Rake” is 100.
But the company may have several warehouses, then for each product “Shovel” we will see the numbers for “Warehouse 1”, “Warehouse 2”, etc. (nested grouping).
As a result, the report displays a lot of numbers. We don't need so many numbers. Then we introduce selection - only for the product “Shovel” and for “Warehouse 1”.
Thus, when working with reports there are basic principles:
- The report is numbers in the context of reference books
- Directories can be grouped, grouping can be complex - nested, by rows, by columns
- The report is generated for a date or for a period (two dates: from and to), i.e. cutting numbers for a specific second of time (see lesson Date 1C)
- In order not to look at everything, there are selections that allow you to look at numbers only from the necessary reference books.
Read more about reports and their types..
Why do we need 1C Reports?
When designing a report, it is important to understand the purpose for which they exist.
It is assumed that two types of users work with 1C:
- Ordinary
- Advanced.
The goal of an ordinary user (warehousekeeper) is to find out in a form that is understandable and familiar to him the list of goods in his warehouse for which he is responsible. If a couple of columns are different (or the entire type of report) it will be an emotional shock for him.
The goal of an advanced user (analyst) is to analyze 1C data. Data analysis is like chess or a detective story:
- In one report you see the final figures
- If you don’t like this number, you try to delve deeper into it to understand where it came from.
- You get into its components and see another one of the numbers that seems strange to you
- And so on.
Such a user can spend days crawling through reports in order to get to the bottom of the data. He doesn't care what the report looks like. For such users, the concept of an OLAP cube was invented a long time ago. A structure containing the necessary data, which the analyst can look at in any way he wants.
As you can see, there is a conflict of interest. This is where Report Settings and Report Options came from. These are preset selected groupings, selections and other report settings (by an advanced user) and saved in the database so that ordinary users can simply select the usual option and view it.
Where are 1C Reports located?
Reports in the 1C thick client are usually displayed in a separate Reports menu. Although, still don’t forget that the interface is changed by the programmer, and imagination sometimes takes you far..
The thin client does not have a special Reports tab - they are scattered across all tabs. Although on each of them, at the very top left there is usually a link to all reports on this tab.
For the administrator (i.e. that same programmer) there is a standard menu that contains all 1C configuration documents. This is the Operations / Reports menu, through which you can open any report.

The new 1C thin/managed client has a similar menu called All functions. Works the same as Operations in the thick client.

In the Configurator, all 1C objects are located in the configuration window, divided into branches. The reports are located in the branch of the same name.
By expanding the branch you see a list of specific reports. The working method was described in previous lessons. The editor opens by double-clicking on a specific document.

The 1C report can be external. This means that it is not in the configuration, but saved in a separate file (usually with the .erf extension). Then you can simply open it like a regular file, either in the Configurator or in Enterprise mode (File / Open).
There is also a special standard processing called 1C Report Console. It allows you to write reports on the fly. It can save templates for written reports into files (with the .dcf extension). If you have a report in this form, then you need to first open this processing, and then open the report in it.
