Have time to do everything, don’t forget anything and don’t make mistakes! You will be surprised, but it is with similar thoughts that many modern people go to bed or get up in the morning. What methods and means are not used to increase professional and personal productivity. Some people set alarms and reminders on their personal electronic devices, while others “the old fashioned way” cover everything around them with colorful stickers. But there is one really convenient option that works - a checklist. What is it and is this magical remedy suitable for everyone?
Magic lists tested in flights
It is believed that checklists originally began to be used in aviation. Flying an airplane involves performing a number of complex operations in a specific sequence. And without a reminder system, even an experienced pilot with an assistant can make a mistake, and mistakes in such a matter can have total consequences. That is why, as an additional “insurance”, aviators are offered a checklist for each flight. What is this? Essentially, a list consisting of individual actions that need to be completed, in this case organized in the correct sequence. Since this tool works ideally in aviation, it was also adopted by civilians whose professions are far from aviation.
Who will benefit from checklists and why?

Daily reminder systems are useful for anyone who wants to increase personal productivity. Time management is an area of knowledge whose basic principles and techniques can be used equally successfully by a manager, a novice entrepreneur, and any housewife. Only the specifics change, since each type of activity has its own specifics. In its standard version, a checklist is a list of actions and tasks. But if necessary, you can compile it in the form of a list of some individual items. Many people keep shopping lists - and these, in fact, are also checklists, just like any culinary recipe, written down in a column as a set of components with dosage recommendations. By the way, in almost all catering establishments such reminders hang in the kitchen for cooks so that they can cook faster, using tips on the weight of the portion and each specific product used in a particular dish. Most often, a checklist is created for one person, but if a certain task will be solved by a group of people, the list will also help out. In this case, it is necessary to break the task/final goal into sub-items, each of which will be carried out by one employee. Next, each task is assigned to a specific performer and, if necessary, he writes it down for himself step by step in a personal checklist.
General drafting rules
If you want to become more productive and get more done without too much fuss, it's time to try creating your first checklist. Such a plan should have a clear structure and attractive appearance. It is also advisable to maintain a time sequence (you can refuse it if all tasks are open-ended). Avoid long paragraphs, it is advisable that each task is expressed in 3-4 words, and be sure to use verbs. How to create a checklist that will work? It's simple - choose a format convenient for you: paper, a note in your phone or a file on your computer. In total, you should have two columns, in the first the number will be written down and the task itself is formulated, and in the second, a mark will be placed as it is completed. Experts advise not to cross out completed tasks, but rather to mark them with ticks or crosses.
Formulate tasks correctly

In order for your checklists to really start working, it is important to learn how to correctly formulate tasks. Things that are performed regularly do not need to be divided into sub-items, but it is advisable to break down one-time tasks and assignments into sub-items. For example: it is advisable to write down negotiations with new clients with at least 3 notes, highlighting for yourself those topics that need to be discussed. If you need to send a daily report, write the task in one paragraph. Be sure to write down anything you might actually forget. To reduce the time it takes to complete tasks, you can also make detailed notes in the checklist, for example, enter contact information of those with whom you plan to contact.

Some business planners advise writing down tasks on a checklist as if they had already been completed. Accordingly, write not “must be done...” but “...done!”. This is a fairly effective technique from a psychological point of view, but it will take some getting used to. The labeling system is also convenient to use. Choose the option that is most convenient for you: text highlighters, underlining. But try not to get carried away with the selection, otherwise you will end up with a checklist that is too colorful and bright. Filling out the to-do list should be done in one color, and for highlighting, use no more than two colors, marking what is truly important.
Don't try to do everything

A popular question among those who are just starting to work with to-do lists: a checklist - what is it, a weekly or daily work plan? Long-term goals and activities should be written down separately. A checklist is a mini-list designed for one day. The total number of points should not exceed 20. Otherwise, you will either fail or become overtired, both of which have nothing to do with productivity. Creating a checklist can become a regular evening or morning ritual. At the end of the day, it's time to review your list and understand whether all the planned tasks were completed to the required extent.
Verification is required
So let's say you've finished creating your first checklist. What to do next? It's simple, now is the time to read it carefully and check it. Firstly, it is important not to really forget or miss anything. Secondly, during the check you can adjust and add something if necessary. And only if you are satisfied with everything, you can take the checklist to work. Try not to forget to make timely notes on completing tasks. If you think that creating checklists is long and difficult, we hasten to dissuade you. For convenience, you can store some templates, for example, lists for packing things for a business trip, or basic tasks for every day (provided that they are repeated). On average, filling out the checklist takes no more than 10-15 minutes along with checking; it is only important to choose a time when no one and nothing will distract you.
Analysis Tool

A checklist is not only a tool for reminding and increasing productivity. You can also use to-do lists in a corporate environment. The manager can create checklists for his subordinates and, with their help, monitor and control the process of completing tasks. This tool is also useful if you are just starting to work on yourself and are looking for the most suitable methods and options for distributing daily activity. In this case, it is also necessary to check the number or percentage of completed tasks and unsolved tasks daily and then form a new program for the next day based on the results obtained. It turns out that the question: “Checklist - what is it?” can be answered as follows: a tool for increasing and assessing productivity.
Excel is a fairly convenient tool with extensive functionality. Many applications offer the ability to create various lists, but why use other programs if you have Excel?
In contact with
How to create a convenient checklist (checklist) in Excel
Below we'll show you how to create a table with checkboxes that you can remove as you complete tasks. Excel will even show you when you clear all the checkboxes. Creating a table is quite simple. To do this you need to open the tab "Developer", enter a list of tasks, add checkboxes and advanced formatting. And now, in order.
1. Open the “Developer” tab
Default tab "Developer" not displayed. You can add it to your feed as follows: open "File" → "Options" → "Customize the feed". On the list "Main Tabs" check the box "Developer" and then click "Ready".

2. Adding a list of tasks to the table
In each cell of the table, indicate the task. In our example, one of the cells will contain "Total number of items", second – "Packed Items". Cell "I'm ready" will be displayed in red if not all checkboxes in the list are unchecked, and green if all checkboxes are unchecked.
Open the tab "Developer". Click "Insert" and in the section "Form Controls" select “Checkbox” (icon with a check mark).

3. Adding checkboxes
Click on the cell where you want to add a checkbox. You will see text displayed to the right of the checkbox field. Since we only need the field, select the text and delete it. After you delete text, the field size does not automatically change.

If you want to change it, right-click on the cell to select the field and then left-click on it. This way you can resize it and move it to the middle of the cell. To copy a checkbox field and place it in other cells, select the cell, and then use the cursor buttons (arrow keys on your keyboard) to move to the cell with the checkbox. To copy a checkbox field to other cells, move the cursor to the bottom corner of the cell, grab it with the mouse button, and drag across the cells to which you want to copy the field. Release the mouse button.

Advanced list formatting
Depending on the purpose of the list, you may want to use advanced formatting.
Creating a TRUE/FALSE column
To do this, use the column to the right of the checkboxes. The checkbox will return TRUE(if the checkbox is checked) or LIE(if it is removed). This way you can see if all the boxes are unchecked.
Right-click the first checkbox and select "Object Format".

On the tab "Control" in the window "Object Format" click on the cell selection button on the right side of the field "Communication with cell".

Select the cell that is to the right of the checkbox. The address of the selected cell is placed in the field "Communication with cell" in a compact version of the window "Object Format" To expand it, click on the button again "Communication with cell" and select "OK". Repeat this procedure for each cell in the list.

Total number of items and count of checked items in the list
Enter the total number of checkboxes in the list in the cell located to the right of the cell "Total number of items". The number of ticks can be counted using a special function. Enter
=COUNTIF(C2:C8, TRUE)
=COUNTIF(C2:C8,TRUE)
into the cell to the right of the cell "Packed Items" and press Enter. As shown in the example below, the function will count the number of cells in column C (C2 to C8) that have the value TRUE or TRUE .

Hide TRUE/FALSE column
In order to hide this column, right-click on its header and select the item in the menu that appears "Hide". The column will be hidden.

How to check if all checkboxes are unchecked
To do this, select a cell "I'm ready" and enter
=IF(B10=B11,"Yes","No")
=IF(B10=B11,"YES","NO")
If the number in cell B10 matches the value of the counted flags in cell B11, it will automatically display "Yes", otherwise it will appear "No".

A checklist is a fundamental element of software testing. It consists of a set of tests, upon completion of which it will be possible to make a verdict: whether the product is ready for release or not. And if you’re not ready, say what exactly needs improvement.
Why can’t you be sure of the quality of a product without a checklist?
- You can test an application endlessly, but still not be sure that everything has been tested. To prevent this from happening, you need to stick to a fixed set of tests that cover all functionality.
- It is impossible to draw a conclusion about the degree of readiness of the product for release. Only based on the checklist can you see in percentage terms what part of the overall functionality is working correctly.
- Due to the limitations of human memory and attention, without a checklist it is almost impossible to say with 100% certainty which components of the product have already been checked and which still need checking.
- Without a fixed set of tests, it is impossible to estimate the time required to conduct testing.
The checklist is created based on the Software Requirements Specification. When determining the set of necessary tests, you should be guided by three basic rules:
- The checklist should cover all the functionality of the product being developed. No requirement stated in the specification should be left unattended.
- The number of tests should be minimized. The more requirements are checked by one test, the better.
- The test suite should not repeat the requirements, but verify them.
When should you start creating a checklist?
At the final stage of creating Specifications. The QA specialist's comments should be discussed and included in the requirements before the development process begins. Otherwise, the risk of spending disproportionately more resources on reworking already implemented modules or delivering a product that does not meet the customer’s expectations increases.
How do we create and maintain checklists at Magora Systems?

In software testing, the organization of the process is very important: who is doing what? Who tested what, when? On which build did this or that error first appear? Who tested this? What is our requirements status?
Due to the remote working team and generally out of habit, we considered only web options. Having discarded solutions that were completely unsuitable for us based on the primary analysis, we were left with three candidates to choose from:
The result is: Triple Threat Match. We will see who wins in a fair fight.
To begin with, we as a team determined the selection criteria:
- License cost: preferably free, or at least inexpensive;
- Supported Environments: the team uses Google Chrome, Mozilla Firefox, Safari - no one is ready to give up or change browsers;
- : here the most important thing for us was the convenient creation of test sets, maintaining statistics of completion and visual reporting;
- Availability of test management elements: I really want the ability of a tool to plan my tasks, control plans and deadlines;
- Usability: if someone on the team doesn’t like something, then we’re unlikely to waste our time and “get into it.” Everything should be clear right away.
Price
Let's go in descending order:- TestRails offers us exclusively paid licenses; depending on their conditions, they will cost from $69 to $8999, a serious fee for a serious product. In order not to buy a pig in a poke, we are offered to use the test version for 30 days, which will be free - this is what the analysis was carried out on. In our case (up to 15 users) TestRails will cost 1399€ or 2149$.
- Sitechсo for local installation costs 12,000 rubles, SaaS use is free. Considering the work using the https protocol and the customers who are not too strict in terms of security, the web version suited us quite well.
- TestLink is free if you install it on your server. I had to tinker, but it started. In terms of price, it is a clear leader.
Supported Environments
Regarding compatibility, all browsers claim to support TestRails and TestLink, but IE is not supported in Sitechco:
Considering our set of environments, this is not critical, but for many users (especially those testing some banking software in stripped-down environments) it may be.
Test management functionality
The most important criterion for us in choosing a system, naturally, is its functionality. We worked together on a list of necessary “features”:- Creation of tests and checklists;
- Control of testing;
- Import and export of tests (desired format - tables);
- Reports on testing and software quality assessment;
- Division of user rights;
- Integration with Redmine;
- Maintaining requirements with test coverage analysis;
- External API for auto-tests;
Creating tests and checklists
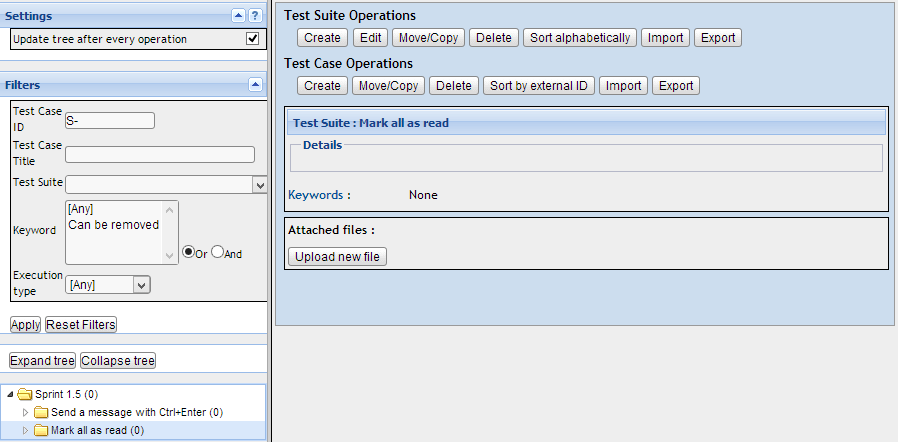
In TestRail, test creation is implemented using Test Suite, into which Tests are placed.
Adding is done quickly, according to the principle of creating a Test Case and a separate description, with the ability to divide into sections and attach files, if necessary. Inside the test, you can describe the steps in detail, but in most cases we limited ourselves to clear headings.

Sitechco implemented test kits in the form of Check- and Cheat-lists. The Checklists themselves are simple, nothing superfluous or abstruse: test, verification, priority, and various additions: attaching requirements, labor costs, hierarchy in the form of groups and master groups.

In my opinion, cheat sheets with an already existing set of tests play an important role. It will save time on creating your own and will be useful for the future. These elements play the role of a constructor: you write standard cheat sheets and insert them into checklists as needed. It’s convenient when there are a lot of standard checks, for example, we need to check different fields for both usability guidelines and XSS/SQL injections. The data is repeated, copy-pasting is evil, but you need the status of passing in different contexts and for different fields.

Creating tests in TestLink is somewhat reminiscent of the creation forms in TestRail. By analogy, test cases are created in Test Suite, into which tests are nested.
It looks quite confusing and at the same time primitive:
The same tests can be added to different scenarios, which in our case performs a similar function as cheat sheets in Sitechko. But in order for the tests to be atomic and small (with a clear result for the report), TestLink seemed to have too many body movements. Well VERY a lot of.
Results control
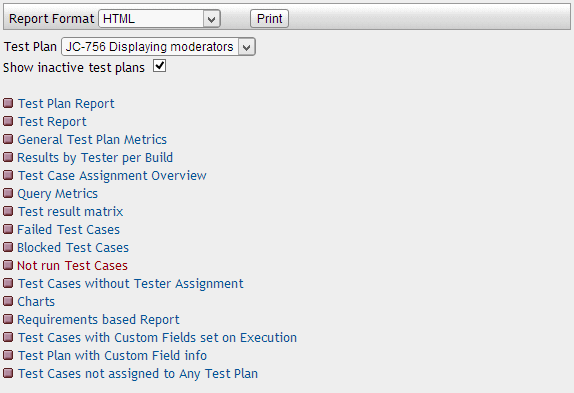
TestRail developers offered their clients several reporting options:
This allows you to collect information about testing by bugs, results, launches and users. But! Each report must be processed, which is very inconvenient and forces you to make unnecessary movements to obtain information, plus time is spent on generating the report:

Although this has its advantage - there is the possibility of sending reports to several e-mails. As for the report type itself, a graphical representation of the results and a list of all tests with the corresponding value are displayed.

Sitechco allows you to generate reports automatically, without performing unnecessary actions to obtain them. 4 main types of reports provide complete information about project testing.

The run report displays the entire list of Checklists used for testing; it is possible to view general and detailed information. Based on the results of the passage, you can see a report on the last 5 runs of the Checklist, plus, you can customize the report for yourself. The group report form shows a graphical representation of the result:

TestLink made us sweat and suffer with running tests to pass. The system did not give in for a long time, which I no longer liked. After joint discussions, we figured out how to do this. The developers proposed a version of the report in this form, which seemed insufficiently informative to us:

Although there are a lot of report options, they are all of the same type and in an unacceptable, at least for us, format.
Import and export of tests (desired format - tables)
TestRail allows export in 3 formats: xml, CSV and Excel. But strangely enough, when I tried to get a report in Excel, it was given to me in CSV format.
In import, everything looks simpler and is presented in the form of selecting a file from a PC in xml format. There are also options to add to an existing list of tests and create a new one.

Sitechco does not lose its ambitions and has introduced data export in xls format to its users. But there is also a catch here: opening the file is only possible in Microsoft Office.
But the import was very interesting. I didn’t have to save anything into a separate file - pasting from a file on a PC or Google Docs happened successfully and without unnecessary movements, by simply copy-pasting the necessary table rows.

Export to TestLink is presented in only one format - xml. It is possible to download both a complete list of test cases and individual folders.

Import is supported in a similar format - xml. Presented in the form of downloading a separate file from a PC for the general list and for the folder separately.

Division of user rights
So, let's start in order. TestRail offers us a choice of 4 roles:
Roles can be easily edited by setting checkboxes to allow actions:

I was also pleased with the function of creating separate user groups, which allows you to divide users into separate lists:

In the “kitchen” friend I discovered 5 user roles:

For a long time I tried to understand who can do what, but the answer was “on the surface” - the help contains a detailed description, which simplifies the task. The only thing I would like is to create my own lists, but apparently this is not provided in the web version.
TestLink offers its users to take advantage of already built-in options:

There is also the ability to create your own lists of users, with rights assigned:

I have the impression that TestLink and TestRail have, in some respects, identical modifications in the settings. But TestRail has worked on ease of use, but TestLink is not very convenient.
Integration with Redmine
Our company uses Redmine and it is logical that we were looking for a system that supports integration with this bug tracker. All three candidates are included in the selection list. I will try to describe each in more detail.Testrail. The integration, as other users have said before, is “simple and ingenious” at the same time:

This setting is suitable for most online bug trackers. When the bug was introduced, the form, as it seemed to me, was not thought through to the end and therefore contained a minimum number of fields.

Perhaps the developers did not want to complicate their lives, or perhaps it was done in a hurry. But personally, I didn’t like it much, we fill out more fields when creating errors, and it’s inconvenient to log in and edit it in Redmine after creating an error from TMS. The link to the bug itself is displayed next to the test data, which does not make it difficult to understand, and when you click you can see the information in more detail - this is very convenient:

But the main disadvantage of integration via TestRail is the authorization of only one user, which, as a result, is very inconvenient when a programmer is analyzing bugs. There are unnecessary questions and unnecessary fuss.
Integration settings in Sitechco are quite simple and are carried out step by step. It's hard to get confused. Initially, a project is selected, a link to the bug tracker itself and administrative access to it.

All my settings had an impact on the forms to fill out. Nothing to say, well thought out and for people.

There is nothing supernatural in the reports either, a list of bugs separated by commas, the data is referenced and displays the status of the bug at the moment.

TestLink. The integration is similar to TestRail, so I won’t dwell too much on it, since I didn’t like the integration itself initially.

It’s very inconvenient to create bugs in this format, living in a world of developing technologies.
Maintaining requirements with test coverage analysis
The next important point for us is connections with design requirements. In our project, they are not maintained in detail, but the status on them must be transparent, timely, and previously we used a Google sign in which we always forgot to update something.Having tested all three of our candidates, I did not notice the obvious in TestRail, so on this point he is out of the game.
In Sitechco, the “Requirements” item is in the main menu, but it made me squirm before I could make it active (through the project settings, as it turned out).
The creation window does not contain anything superfluous: a title and description. The only thing missing is adding attached files - you may have to use links to third-party file hosting sites.

I was also pleased with the import of requirements, apparently created by analogy with the import of tests, also nothing complicated or abstruse. Presented in the form of a window, with a choice of the directory for import and the field itself. There is also a certificate:

Having created/imported the requirements, we can create a connection between each test (a check in the checklist, and not the entire checklist) and the requirement; this connection works on the many-to-many principle:

Let's see how things are going in TestLink. The manufacturer offers a set of functions for working with requirements: create, import, export, create test cases and copy requirements.
The operations for creating requirements are quite simple, they have the ability to attach files, which more than covered all my desires for the type of requirements. But it was not very inconvenient to use - like almost everything in TestLink.

The import itself, as well as the export, is supported in the CSV\XML\DocBook format. Apparently the entire Testlink project is focused on the CSV format.

Requirements are attached to the Test Case and help in the testing process in order to verify that the requirements are fully covered by checks and that there are no gaps during testing.
Usability:
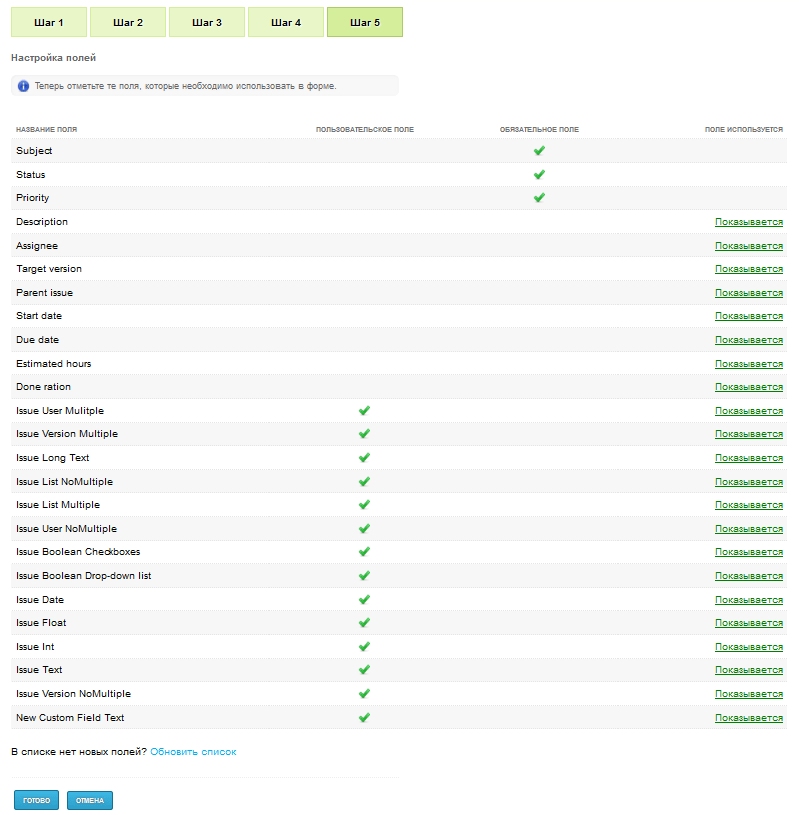
I said a little about the ease of operation at the beginning; I would like to continue the conversation on this topic and reveal the following features. The ability to use hot keys to create tests and groups in checklists is implemented only in Sitechco.
The same points, such as descriptions of user groups and ease of use, are noted in all three products. But against the backdrop of all the standard requirements, I really liked the fact that TestRails allows you to independently create a project address, and testlink went even further and offered its own data storage server. Sitechco, on the other hand, was distinguished by its conservatism in this regard and did not indulge in additional bells and whistles, apparently relying on the widest functionality and ease of use.
Special offers:
I couldn't find anything supernatural. The only thing that caught my eye was the Sitechka task scheduler, which is somewhat reminiscent of Todoist, due to the display of the number of tasks on me and the ability to plan for the future.
Most importantly, as our test manager said: “Now I can control you,” and smiled sarcastically. It turns out that this tab also allows you to view which checklist is currently running and which has been completed. “Palivo,” I thought and tried to look for this function in TestRail and TestLink. Alas! This functionality is supported only in Sitechco, and to consider this a plus or minus - my boss and I have different points of view.
Due to the development of all sorts of mobile features, I also expected that I would dig up similar things (mobile versions, mobile applications), but, unfortunately, none of the competitors had this functionality in their arsenal. Testing with a bunch of tabs is inconvenient, you will agree. Therefore, it would be “at the register” to mark the results on the tablet and at the same time not clutter up the space on the table.
As one of the TV presenters of the Ukrainian channel, Olga Freimut, says in her checks: “Well? Let's talk about?" (Well? Let's talk?)
- TestLink. Actually, what did I expect from a free service? All guesses were confirmed. Check the box that says it’s free and has a basic set of functions – that’s all. Sorry, buddy, you're knocked out, everything is somehow complicated and you didn't see the highlight.
- TestRails. Yes, you can’t say anything, it’s a powerful thing, with its pros and cons. But due to the lack of multilingualism and not being so “cheap”, I could not afford it. I won’t be working alone, so I had to “remove my egoism from the settings.”
- Sitechco. Simple and tasteful, nothing abstruse or difficult to understand. It may have seemed to me, but the company has only recently begun to appear in the IT arena and underestimates its capabilities, or the special price of the product due to the economic crisis of the countries.
| Comparison criteria | Sitechco | TestLink | TestRails |
|---|---|---|---|
| Basic | |||
| license cost | $0-$500 | - | $69-$8,999 |
| browsers | except iE | All | All |
| functional | |||
| autosave/version control | Yes | Yes | Yes |
| templates | Yes | No | No |
| print/link to report | Yes | Yes | Yes |
| import Export | Yes | Not really | Yes Yes |
| mobile version | No | No | No |
| environments/builds/requirements | Yes Yes Yes | no/yes/yes | no/yes/no |
| tips | Yes | No | Yes |
| Elements of test management: | |||
| test plan | Yes | Yes | No |
| test cases | Yes | Yes | Yes |
| autotest support | No | No | No |
| checklists | Yes | Yes | No |
| Differentiation of user roles | There is | There is | There is |
| support for file attachment (file storage) | No | No | No |
| notification email | There is | No | There is |
| Working with Checklists | |||
| setting up fields in the CL (different types of CL, separately setting up a test environment, for example) | There is | No | No |
| ease of editing (subjective assessment) | comfortable | not convenient | not very convenient |
| connection with requirements | Yes | Yes | No |
| Reporting | |||
| by assemblies | Yes | Yes | No |
| by environment | Yes | No | No |
| by testers | Yes | No | No |
| by completion date | Yes | No | Yes |
| by result | Yes | Yes | Yes |
| any display of the status of the product being tested | There is | There is | There is |
| reporting on different personnel at once | Yes | Yes | Yes |
| claims coverage reporting | Yes | Yes | No |
| reporting on requirements testing results | Yes | Yes | No |
| Usability | |||
| simplicity | Yes | Yes | Yes |
| hotkeys | Yes | No | No |
| description of user groups | Yes | Yes | Yes |
Based on your preferences, I tried to objectively compare these three fighters, but have not yet decided on 2 winners: kitchen utensils or business class items. Both candidates have their pros and cons, which makes them attractive in their own way. In any case, the issue will be decided by the Finns. director based on the allocated budget, but all I can do is wait.
Have you ever caught yourself thinking that this is not the first time you are repeating something to an employee?
Or notice that when performing a familiar task, employees make the same annoying mistakes, wasting time?
If yes, then it’s time to instruct employees to draw up checklists.
Check list(Check list) - a list containing a number of necessary checks for any work. By marking items on the list, an employee can find out about the status/correctness of this work.
The importance of checklists cannot be overestimated. No matter how experienced an employee is, in a hurry he can easily forget an important detail. Let's take, for example, a common situation - preparing to participate in an exhibition. This is a very expensive undertaking. One missed detail - flyers not printed on time - can cost half the budget.
Checklists may be used in various fields: there are checklists for waiters, for pilots, for marketers, for web designers.
Below are the rules for creating checklists that will help your employees create a useful and high-quality tool.
Rules for drawing up checklists
1. One point - one operation
The checklist items are the minimum complete operations. What does it mean?
Ordering the production of business cards and delivering business cards to the office are 2 different operations.
Therefore, in the checklist they are displayed as separate items:
business cards have been ordered
business cards delivered to the office
2. Points are written in an affirmative form
The purpose of the checklist is to check readiness, so it is better to compose the items in an affirmative form - “ordered, delivered.” Compare the wording:
“order business cards” and “business cards are ordered.” The second option requires more responsibility.
3. The optimal number of points is up to 20
Checklists should not be long. The optimal number of points is up to 20. If necessary, it is better to break the task into several stages and create a separate checklist for each stage.
Checklist example:
Effective implementation of checklists
1. Testing
After drawing up the checklist, mentally go through all the points together with the employee. Write down what was missed. Place the points in the correct order. Make edits.
2. Design
The checklist should look aesthetically pleasing - then it will be more pleasant to work with it.
3. Convenient access
Organize shared access to documents for employees so that they can be easily printed at the right time. Print the resulting list in the form of a table (if the check sheet is filled out every day).
Benefits of using checklists
- Structuring information in the employee’s head. When writing down the necessary actions, the employee clearly understands the required sequence of tasks.
- Increasing the speed of training of new employees. There is no need to repeat the sequence of operations for the hundredth time. It is enough to give a short briefing and give a checklist for independent work.
- High results, reduced number of errors. As mentioned at the beginning of the article, checklists help to avoid punctures and careless mistakes.
- Interchangeability of employees.
- — employees will spend significantly less time redoing tasks.
Examples of useful checklists for online business
When creating a checklist, remember: you are creating it primarily for the employee, he must intuitively understand what’s what and not get lost among all the points you have written down. And it is better to analyze the execution of tasks using specialized programs. For example, Yaware.TimeTracker, which allows you not only to create and delegate projects and tasks, but also to control them at all stages of implementation, analyze statistics and productivity of each employee. You can try new functionality. Or sign up and get 14 days free - test before you buy!
Try Yaware.TimeTracker for free 14 days, all inclusive
